
 |
 |
1. Profile Overview |
| 2. Profile documents content | ||
| 3. Wizard interface usage | ||
| 4. User / Profile association | ||
| 5. Using %, # and @ keywords |
1. Profile Overview |
|
|
 Back to Top
For easier client desktop management, the Desktop Manager database may be used to define the Notes Profiles documents to be applied to a group of users having the same needs (community). These profiles can include a large range of Notes configuration settings:
- Personal NAB documents (Location, Replicator Page, Connection, Account, Program, Cross Certificates...),
- Mail database documents (Calendar Profile, Out Of Office, Mail Rules...).
- Notes databases the user can access (locally replicated or simply available as icons on the workspace).
- User Preferences (Workspace display options, Notes.ini, Bookmark link, week start day, list of address books...).
- SameTime Preferences (Contact List, Server Communities, Meeting Rooms...).
- Schedule administration tasks on local replica databases (Compact, Fixup...).
- Control user actions by using Hook documents (define the maximum attach file size a user can send by email...).
- Apply Pre or Post session Scripts to backup / restore the Notes configuration.
- ...
The application of one or more Profiles documents to a user desktop ensures that its configuration will comply with the chosen parameters. As Profiles are systematically reapplied (unlike Tasks, that are run only once), any configuration that has been changed by a user will be restored immediately (within the area covered by options of the Profiles specified for this user). Using Profiles is a way of ensuring the desktop configuration durability.
The other advantage of Profiles lies in the changes are immediately applied to all the desktops with the Profile. If a database is added to a Profile configuration, all users with this Profile will receive that database (whether as an icon, or as a replica). If the IP address of one of the Connection documents linked to a Profile is changed, all users linked to this Profile will have the IP address of the Connection document for their local address book immediately modified. Using Profiles therefore allows the immediate propagation of configuration changes.
Similarly to Tasks, the database deployment (icons and replicas), the modification of user preferences and the synchronization of Location, Connection and Account documents associated to the user Profiles will be performed when opening the Desktop Manager database, in the Profiles  application section of the desktop management follow-up document.
It is possible to create, modify or delete Profiles anytime and to apply them to / remove them from users. As many Profiles may be associated with one user, it is possible to create generic Profiles that apply to several users, and to create more specific Profiles that only apply to a smaller group of users.
The creation and modification of Profiles is restricted to the users having the [ADMIN] role in the Desktop Manager database ACL. Employees with only the [HELPDESK] role only have read access.
2. Profile documents content |
|
|
As many profiles may exist within a company, multiple Profiles may be created in the Desktop Manager database. Such documents are created using the  button in the Enforce Notes Configuration / Profiles Documents view. In order to ensure the validity of these documents, a number of fields must be completed.
Main

 : Name of this Profile document. As many Profiles documents can be stored in the DskMgr.nsf database, each one of them should be given a unique name. This is a required parameter.
 : Free text zone used to specify the Profile document type and the related information.
 : It is possible to associate to this Profile document a category that's helps Profile documents to be sorted in the view.
 : Desktop Manager Internal Number allowing to count the number of time the document has been modified.
 : Name of the last person who edited the document.
 : Document creation date.
 : Last modification date of the document.
Options

 : Limits application of this Profile to Silent mode and/or Full mode.
 : Profile Frequency. By default, a profile is applied on each execution of Desktop Manager running in Silent mode as well as Full mode. By setting a Frequency, it regularly schedules (but not every day) maintenance operations like cache deletion or purge of the log.nsf database.
 : Lets you define an execution order for the Profile if there are many to be applied. Usually, the execution order is the same than the declaration of the Profiles in the User document. By defining a number here (1-N), you can strictly control which Profile will run first.
 : When applying Profiles documents in Full Mode, we ask Desktop Manager to display only the Profile title, not every actions performed by this Profile.
 : This is a way to process, at the end of the Notes session (when the user quits Notes), all the tasks performed by the DskMgr.exe when the Notes client is not running (workspace icons removal, deletion of the Cache.ndk, move files...). If this option is checked, the DskMgr.exe program is started in the background by Desktop Manager, and it waits until the end of the Notes client session to process the DskMgr.ini file. If this option is already selected from the Setup document, it is not necessary to check it.*
 : If the LotusScript Agents launch by this Profile want to modify the User document, check this option to let Desktop Manager update the User the document before running the agents. So data won't be lost and the modifications done by the agents will be take into account.
Conditions

There are many ways to control whether a Profile should be applied or not to a User during the Desktop Manager session:
 : Will only run this profile for users with a Laptop.
 : Won't run this profile for users with a Laptop.
 : Will only run this profile for Virtualized Users (CITRIX...).
 : Won't run this profile for Virtualized Users.
 : Will only run this profile for Users hosted by one of the following Mail servers.
 : Will only run this profile for Users having one of the following Mail Domain.
 : Will only run this profile for Users having such certificates.
 : Will only run this profile for users using Eclipse Notes client.
 : Won't run this profile for users using Eclipse Notes client.
 : Will only run this profile for Users having a Notes client release specified in this field.
 : Will only run this profile for Users having a Notes client's Build Version as defined.
 : Will only run this profile for Users using a Desktop Manager language interface specified in this field.
 : Will olnly run this profile before or after the specified time/date.
 : Will only run this profile for Users having a IP Address matching the IP Address ranges.
 : Will run this profile only if the Notes.ini value equals (or not) the specified value.
 : Will run this profile subject to the values of environment variables.
 : Will run this profile subject to the values of Windows registry keys.
 : Will only run this profile for Users running (or not) Desktop Manager for the first time.
 : Limits application of this Profile to some Location documents. This way, a Profile having some settings to force the replication of databases cannot be applied to a location defined as not connected to the server. This field should be left empty in order to allow application of this Profile document, regardless of the current location.
Summary

 : List of actions to be performed by the Profile when Desktop Manager is executed on user's workstation. The list is sorted in order of execution.
 : Some of the actions need to be done when the Notes client is not running. This list shows actions performed by the file DskMgr.exe at the end of the Notes session Notes (the list of actions that are pending in the DskMgr.ini file).
Warning

 : Parameter List showing the incorrect functions like servername is not named in canonical format (CN=..../O=...), database name extension which isn't ".nsf" ou ".ntf"... The parameter analysis is done when the document is saved.

Hook

 : A list of the Hooks which will be installed on the user's workstation.
Workspace Preferences

 : Modification of the Workspace Display Options (Stack replica Icons, Display unread documents count, Display Server Names). As this process cannot be run when the Notes client is open, it is postponed to the end of the Notes session, using both the DskMgr.exe executable file and the DskMgr.ini command file.
Workspace File

 : Backup the Workspace current status (database icons, pages, display options) and keep uo to X days of history. This backup is performed in the Temp folder of the user, as binary files named DskMgrWorkspace_20070417.bin (where 20070417 is the day date of the backup : 17th April 2007). The backup of the Workspace status allow a restore process (see below). As this process cannot be run when the Notes client is open, it is postponed at the end of the Notes session, using both the DskMgr.exe executable file and the DskMgr.ini command file.
The DskMgrWorkspace_*.bin files can be copied from a computer to another one, in order to transfer the full Workspace settings (database icons, pages, display options).
Workspace Icons

 : List of databases to add to user workspace. These databases are neither copied nor replicated onto the workspace and only a link, (represented by an icon on the workspace) is provided. Nothing will occur if the database already exists in the workspace. As Profile application is a recurring process, it is most of the time recommended to check that the database icon exists on the workspace.
 : List of the icons to be moved. The parameters are the name of the database, the name of the Page and the new X - Y coordinates. The destination Page can be defined with its name or position. If the position is used, the required syntax is "Page #" + number (example : Page #3 for page number 3). The pages are numbered from 1 to 32 (maximum number of page). The X - Y coordinates for an icon define its position on the workspace. The number starts from 1. The coordinates for the sample icon (see below) are 5 - 2:
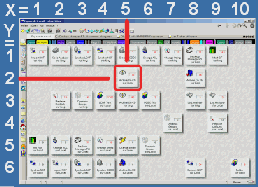
As this process cannot be run when the Notes client is open, it is postponed at the end of the Notes session using both the DskMgr.exe executable and the DskMgr.ini command file.
 : List of the icons to be deleted on the workspace. As this process cannot be run when the Notes client is open, it is postponed at the end of the Notes session using both the DskMgr.exe executable and the DskMgr.ini command file. The Joker character '*' can be used to specify a set of databases to be removed (Application\*.nsf). If you use the keyword MISSING_DATABASES, all the local missing databases icons will be removed.
Workspace Pages

 : List of workspace Page to be created or moved. For each page, the required parameters are the name, the color and the position. If the page already exists, the syntax Page # can be used. The color code is a number between 1 and 240. This number is the position of the color in the following color table.The first colors are : black (1), white (2), red (3), light green (4), light blue (5):

The pages are numbered from 1 to 32 (maximum number of page). If the page doesn't exist, it will be created (empty). If it already exist, it will be colored or moved. As this process cannot be run when the Notes client is open, it is postponed at the end of the Notes session using both the DskMgr.exe executable and the DskMgr.ini command file.
 : List of workspace Pages to be renamed. The destination Page can be defined with its name or position. If the position is used, the required syntax is "Page #" + number (example : Page #3 for page number 3). The pages are numbered from 1 to 32 (maximum number of page). As this process cannot be run when the Notes client is open, it is postponed at the end of the Notes session using both the DskMgr.exe executable and the DskMgr.ini command file.
 : List of Pages to be removed from workspace. The Page can be defined with its name or position. If the position is used, the required syntax is "Page #" + number (example : Page #3 for page number 3). The pages are numbered from 1 to 32 (maximum number of page). Beware, the removal of a Page will also remove all the database icons displayed on this page. As this process cannot be run when the Notes client is open, it is postponed at the end of the Notes session using both the DskMgr.exe executable and the DskMgr.ini command file.
Notes Files Cache

 : Set a maximun size limit to the Cache.ndk . This action is done by the file DskMgr.exe at the end of the Notes session Notes (action list are awaiting in the DskMgr.ini file).
 : Delete the Cache.ndk. This action is done by the file DskMgr.exe at the end of the Notes session Notes (action list are awaiting in the DskMgr.ini file).
Notes Files Bookmark

 : Set the Workspace icon
  in the left part of the screen, under the Replicator icon
  . It is possible to define the Workspace as the Notes Default Page.
 : Add database icon on the Bookmark, either on the Database folder or on the root of the left tool bar. If the Frameset is filled, the database icon will open on this frameset name or using the standard database properties Frameset. It is also possible to define a database as the start Page of the Notes client (Is Default Page).
 : List all the Databases (located on the Database folder or on the root of the left tool bar) to be deleted from Bookmark. The databases are identified either by their Names (path), Titles or Replica IDs. It is possible to use Joker character (*).
Notes Files : Notes.ini

 : List of values to modify in the user’s Notes.ini file.
Notes Files : XML Files

 : List of XML files which have to be created / synchronized with the ones already existing on user's desktop.

 : List of values coming from XML files you want to modify. The required parameters are:
- The full path of the XML file (you can use @Keywords)
- The name of the variable to modify (specify the full path of this variable within the XML file tree):
 <?xml version="1.0" encoding="UTF-8"?>
 <providerConfig lastModified="Thu Mar 25 12:14:39 CET 2010">
    <communities>
        <community alwaysEditActiveText="true" alwaysEditAwayText="true" alwaysEditDndText="true" ...
- The value we want to set (you can use @Keywords)
- The key used to identify the right variable:
For some XML files, it may be difficult to define the unique path of a varibale (connection-context.connection.proxyHost) because numerous variables may have the same path:
<?xml version="1.0" encoding="UTF-8"?>
 <connection-context>
   <connection connectionType="tls-direct" proxyHost="192.168.210.10" proxyPassword=""/>
   <connection connectionType="tls-proxy" proxyHost="192.168.210.25" proxyPassword=""/>
   <connection connectionType="tls-vpn" proxyHost="192.168.210.59" proxyPassword=""/>
 </connection-context>
To identify the variable connection-context.connection.proxyHost without any doubt, we have to provide a key used to target the right variable:
| Variable Name : | connection-context.connection.proxyHost | |
| Value : | 192.168.210.25 (new value) | |
| Key Name : | connection-context.connection.connectionType | |
| Key Value : | tls-proxy |
- The options regarding the insert of the value in the XML file:
The following XML file:
<?xml version="1.0" encoding="UTF-8"?>
 <providerConfig lastModified="Thu Mar 25 12:14:39 CET 2010">
   <communities>
     <community alwaysEditActiveText="true" alwaysEditAwayText="true" ...
       <statusTexts>
         <activeText>I am available</activeText>
         <awayText>I am away from my computer now</awayText>
uses the two kinds of variable formats (attribute or not):
providerConfig.communities.community.alwaysEditAwayText is an attribute (Is Attribute).
providerConfig.communities.community.statusTexts.activeText is NOT an attribute.
Notes Files : Prefs Files

 : List of Pref files which have to be created / synchronized with the ones already existing on user's desktop.

 : List of values coming from PREFS files you want to modify. The first required parameter is the full path of the PREFS file (you can use @Keywords), the name of the variable to modify, the value we want to set (you can use @Keywords) and the options regarding the insert of the value in the PREFS file.
Local NAB Account

 : List of Account documents from user's local NAB we want to create / update using Template documents.

 : List of Account documents (already existing in the user's local NAB) we want to modify using Preference documents. The list of target Account documents is defined using a Wizard interface (click the
  button).

 : The list of Account documents we want to delete from user's local NAB. The list of target documents is defined using a Wizard interface (click the button).
Local NAB Connection

 : List of Connection documents from user's local NAB we want to create / update using Template documents.

 : List of Connection documents (already existing in the user's local NAB) we want to modify using Preference documents. The list of target Connection documents is defined using a Wizard interface (click the button).

 : List of Connection documents we want to delete from user's local NAB. The list of target documents is defined using a Wizard interface (click the button).
Local NAB Location

 : List of Location documents from user's local NAB we want to create / update using Template documents.

 : The list of Location documents (already existing in the user's local NAB) we want to modify using Preference documents. The target Location documents list is defined using a Wizard interface (click the button).


: The list of Location documents we want to delete from user's local NAB. The list of target documents is defined using a Wizard interface (click the button).
Local NAB Program

 : List of Program documents from user's local NAB we want to create / update using Template documents.

 : List of Program documents (already existing in the user's local NAB) we want to modify using Preference documents. The list of target Program documents is defined using a Wizard interface (click the button).

 : List of Program documents we want to delete from user's local NAB. The list of target documents is defined using a Wizard interface (click the button).
Local NAB Cross Certificates

 : List of Cross Certificates documents from user's local NAB we want to create / update using Template documents.

 : List of Cross Certificates documents we want to delete from user's local NAB. It is possible to use Joker character (*).
Local NAB Directory Profile

 : List of Preference documents used to modify the Directory Profile document in the user's local NAB.
Replication : Local Databases

 : List of the server databases to be replicated locally on the desktop.Once the database has been replicated, a database replica stub is created and the database icon is added on the user's workspace. It is also possible to define which icon will be on the top of the stack. If the Replicate box is selected, replication will be launched immediately, if not, it will start replicating at the next schedule replication. At last, you can as well add a replication formula which will be applied on each replication. Finally, Flags field can be define if you wish to encrypt the new local database (EncryptSimple, EncryptMedium, EncryptStrong). By default, if the Flag field is blank, the new database isn't encrypted.
 : List of the databases whose Replication Flags should be modified. In order to process several databases; just change the value in column (Number). The flags (value True / False) to be modified are the following ones:
ReplicationFlag1 = Server's Replicator Task ignores this database (Disable Replication)
ReplicationFlag2 = Server's Replicator Task automatically deletes notes that are older than the cutoff date
ReplicationFlag3 = Server's Replicator Task Ignores this database (Never Replicate)
ReplicationFlag4 = Truncate large documents and remove attachments
ReplicationFlag5 = Don't replicate deleted notes into destination database
ReplicationFlag6 = Do not send deletions made in this replica to other replicas
ReplicationFlag7 = Do not send changes in local security property to other replicas
ReplicationFlag8 = Do not send changes in database title & catalog info to other replicas
Priority = Set scheduled replication priority for this replica (LOW / MEDIUM / HIGH)
You can also use the Wizard interface to create the command line by clicking the  button.
 : Define Notes client preference for Managed Replica.
Replication : Replicator Pages

 : These fields are used to control replicator page options. For a given database (Replicated Database), it is possible to specify the replication's active or inactive status (Check), the server used for the next replication (Replicate with server), the replication direction (Direction), the truncation applied to exchanges (Trunc). As database replication options may be different according to the active Location document, the table begins by mentioning the location(s) upon which these options are applied. The wildcard (*) is used to indicate all locations.
 : You can change the path of the databases stored in the Replicator pages. You have to specify the name of the current database path and the name of the new database path. The path can be absolute (c:\..) or relative to the Notes Data directory. You may specify several Location documents (use wildcard character * for all locations).
 : You can change the position of the databases stored in the Replicator pages. You have to specify the name of the database and the new position (1- N). You may specify several Location documents (use wildcard character * for all locations).
 : List of the databases (local replica) to be removed from Replicator page of a Location document. You may specify several Location documents (use wildcard character * for all locations).

 : List of Location documents we want to modify in order to enable / disable the user's personal NAB Contacts synchronization option (displayed in the replicator page). This option is for Notes R.8x users only. If you want to synchronize contacts for R6.x / R7.x users, use the agent R6.x : Synchronize Address Book Contacts.
Mail : Mail File

 : Ask for the local Mail Replica to be compacted if the Profile is running on Mode Full.
 : ou can use the free space % to trigger the compact process.
 : You can ask the user the authorization before compacting its local mail replica.
 : Message to be displayed to the user.
Mail : Calendar Profile

 : List of Preference documents used to modify the Calendar Profile document in the user's Mail database.
Mail : Mail Rules

 : List of Mail Rules documents from user's Mail database we want to create / update using Template documents.

 : List of Mail Rules documents we want to delete from user's Mail database. The list of target documents is defined using a Wizard interface (click the
  button).
Notes Databases : Administration Tasks

 : List of the local databases to be compacted. If one database cannot be immediately compacted (in used by the Notes Client like the names.nsf), it will be done later using both the DskMgr.exe executable and the DskMgr.ini command file.
 : List of the local databases to be fixed up.
 : List of the local databases whose view indexes should be rebuilt.
 : List of the local databases whose Full Text index should be rebuilt.
 : List of the local databases whose Full Text index should be deleted.
 : List of the local databases whose private view design should be updated. Private views are indeed created from the view model present in the database. A model change will not impact the occurrences of private views based on this design. This feature is aimed at updating the private view code according to the original view.
 : List of the local databases whose Deletion Stubs should be deleted.
 : This check box is used to purge the local Log.nsf database by deleting all documents that are more than X months old. As Desktop Manager parses the Log in order to sum up errors that occurred on the user desktop, the fact of not storing (useless) documents for years will speed up the analysis process.
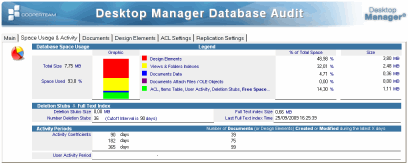
 : List of local Notes databases you want to audit with all details. For each database, a Database Audit document is created in the Desktop Manager database:
 : This feature updates the Notes client configuration in case of a database (used by the User) is moved from a server to another. The process will remove the old database icon and add the new one. If any local replica is detected, it will also modify the servername on the Replicator Page to replicate with the new Server. If the database is a Mail database ('is Mail Database' box), then the process will also update the Location documents and the MailServer line of Notes.ini.
Notes Databases : Modify Database

 : Modify the field values of documents in a local databases. It can run in Search / Replace mode (where a source sub-string is Searched and Replaced by another value) or directly in Set mode, without any reference to the previous value stored in the field:
- The 1st parameter (Local Database Name) gives the name (or path) of the local database to process.
- The 2nd parameter (Documents Selection @ Formula) is a document selection formula (the same as you would find in View definition). It defines the set of documents to process (to process all the documents of a database, use @All). You can also set a Profile document name (CalendarProfile, ArchiveProfile, ...) instead of the @Formula to target the Profile document.
- The 3rd parameter (Fields to Process) define the list of fields to process (this parameter can be multi-valued). If you want to process all the fields, use the value *. When all the fields have to be processed (*), it is also possible to define a field exclusion list, in the 4th parameter (this parameter is also multi-valued).
- The 5th parameter (Source String) defines the sub-string value we are searching for. For canonical names (server names, user names), the full name is mandatory, with the CN= and the /O=. If we do not want to run as Search/Replace mode, but in Set mode (modify the field value whatever is the current value), specify * as Source String for this parameter.
- The 6th parameter (Replace String) is the sub-string used to replace the sought one (Search / Replace mode) or to set in the field (Set mode). For canonical names (server names, user names), the full name is mandatory, with the CN= and the /O=.
Is it not allowed to use both * in the 3rd parameter (fields list to process) AND in the 5th parameter (Source String), because this would turn the process in Set mode for all the fields of the documents = replace all the fields values with the same value (Replace String). Using * in the 3rd parameter (fields list to process) is only allowed if we run the Search / Replace mode (with a value in 5th parameter other than *). You can also use the Wizard interface to create the command line by clicking the  button.
 : Copy documents from a source database to a destination database. Documents selection is done using a @Formula.
 : Synchronizes the content of two Notes databases in a bijective relation (only one Destination database document is associated with one Source database document, and vice versa). This synchronization is done using a selection @Formula and a Primary key (unique identifiers for a Source database document). It is also possible to Delete document into the Destination database which don't have any match from the Source database.
 : List of the databases where we want to delete documents. The documents list is defined with a selection @Formula.
 : List of the databases whose Options should be modified. In order to process several databases; just change the value in column (Number). The options (values or flag True / False) to be modified are the following ones:
R5Option1 = Don't maintain unread marks (True / False)
R5Option2 = Document table bitmap optimization (True / False)
R5Option4 = Maintain LastAccessed property (True / False)
R5Option6 = Allow soft deletion (True / False)
R5Option7 = Don't support specialized response hierarchy (True / False)
R5Option9 = Allow more fields in database (True / False)
IconReplace = Allows or prevents the possibility of replacing the 'Icon' document during the replace/refresh Design (True = Protects from Replace Design, False = Allows Replace Design).
HelpUsingReplace = Allows or prevents the possibility of replacing the 'Using' document during the replace/refresh (True = Protects from Replace Design, False = Allows Replace Design).
HelpAboutReplace = Allows or prevents the possibility of replacing the 'About' document during the replace/refresh Design (True = Protects from Replace Design, False = Allows Replace Design).
CatalogFlag = Allow or prevent a database to be processed by the Catalog task, and so to appear in the Catalog database (True=The database must appear in the Catalog database, False=The database must NOT appear in the Catalog database )
Category = Define the category name used, for this database, in the Catalog database (Category = [Category name]).
LimitUpdatedBy = Define the maximun number of entries permited in the $UpdatedBy fields of database's documents (LimitUpdatedBy = [Number of entries], 0=No limit)
LimitRevisions = Define the maximun number of entries permited in the $Revisions fields of database's documents (LimitRevisions = [Nombre d'entrées autorisées], 0=No limit)
ExpireTime = Define the value for the field $Undelete for the database's documents (ExpireTime = [Number of hour]).
ReplicateUnread = Modification of the option related to the replication of Unread Tables (ReplicateUnread = Never / Clustered / All)
You can also use the Wizard interface to create the command line by clicking the button.
 : List of databases whose Quota should be modified (or set). The size is in Megabytes format (MB). If you do NOT want change one of the two values (Quota or Warning), just leave it blank. If you want to apply the same local quota as the one defined in the Mail database of the server, just use the keyword @MailFileQuota.
Notes Databases : Change Database Design

 : List of the local databases whose structure should be refreshed. It is possible to specify the name of the server hosting the templates.
 : List of the local databases whose structure should be replaced. The template should be stored locally.
Notes Databases : Database Security

 : List of the databases whose ACL should be modified. It is possible to edit entries, roles, administration options, etc... The detailed list and the ACL change command syntax is provided in 4.8- ChangeACL command syntax. In order to process several databases, just change the value in column (Number). You can also use the Wizard interface to create the command line by clicking the button.
User Pref


Some User Preferences values may be set through the Profiles. As not all user preferences need to be enforced, it is only necessary to declare the list of user preferences to be managed in this Profile and to provide their values.
In order to enforce a user preference, just select the check box on the left side of the value (Enforce column) and enter the value:
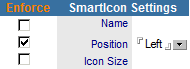 : This example shows how to set the Smart Icon palette on the left side of the screen, while the palette name and icon size are left unset. Users may change the name and size but if they change the position, its value will be reset to Left when applying Profiles.
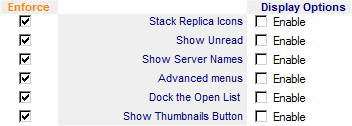
The same principle applies to check boxes: preferences are defined by selecting the Enforce column check boxes and the value is specified by selecting the check box or not:
 : This example shows how the Profile can be used to manage display options for workspace icons, specifying for instance if replica icons should be stacked or not (Stack Replica Icons) and whether the number of unread document should be displayed (Show Unread). First select the Enforce column check boxes (Stack Replica Icons and Show Unread) to set these two preferences, and then define the values in the next column. For the Stack Replica Icons option, the value box is de-selected, as the icons are NOT intended to be stacked. Concerning the Show Unread option, the value is selected to specify that the number of unread documents should be displayed. As server name display (Show Server Names) is required, the check box in the Enforce column is not selected for this option. Users will be authorized to modify this option and the Profile will not overwrite their preferences.
Sametime

Some Sametime Preferences values may be set through the Profiles. As not all Sametime Preferences need to be enforced, it is only necessary to declare the user preferences list to be managed from this Profile and to provide their values.
In order to enforce a Sametime Preference value, just select the check box on the left side of the value (Enforce column) and enter the value in the same way as for User Preferences on the previous tab.

ECL

 : Change the ECL access as Read Only so the User can't modify it anymore. You can also reverse the process (allow the User modify the ECL).
 : Option used to refresh the ECL (execution control list) on the user desktop. The ECL used can be either the Administration ECL (stored in the Domino directory) or a Named ECL (stored in Desktop Manager database).
 : Name of server and name of database hosting the reference ECL. If these fields are left blank, the program will use the address book (names.nsf) of the server hosting the Desktop Manager database. If we want to apply a Named ECL stored in the Desktop Manager database, you have to enter the path of the Desktop Manager database hosting this Named ECL here.
 : Name of ECL to apply (several ECLs may be managed in a database). This setting is generally left blank to specify the administration ECL (stored in the NAB). If you want to apply a Named ECL, stored in the Desktop Manager database, you have to enter its name here.
 : Add a new entry to the ECL. If the entry already exists, it won't be modified.
 : Security flags for the entry to be created.
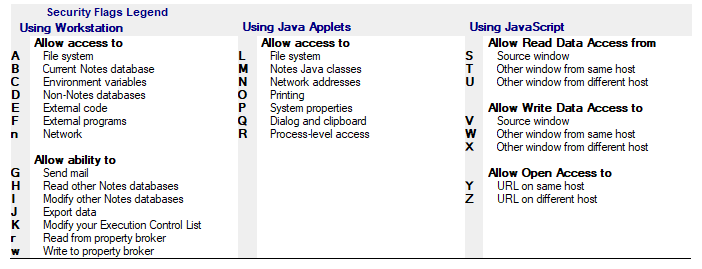
You can also use the Wizard interface to create the command line by clicking the  button.
 : You have to choose in which parts of the ECL (Workstation security, Java applet security, JavaScript security) the entry has to be added.
 : Change the security options for an existing entry of the ECL. You can modify more than one entry by using wildcard character * (ex : CN=*/O=CooperDev). If the entry doesn't exist yet, it won't be created.
 : Security options you want to modify in the ECL entry. By adding a + character to the front of the option letter, you will add this option to the entry. If you add a - character to the front on the option letter, this will remove the option from the ecl entry (see below for options list).
 : You have to choose in which parts of the ECL (Workstation security, Java applet security, JavaScript security) the entry has to be modified.
 : Remove a entry from the ECL. You can remove more than one entry by using the wildcard character * (ex : CN=*/O=CooperDev). You can't delete the -Default- nor -No Signature- entries.
 : You have to choose in which parts of the ECL (Workstation security, Java applet security, JavaScript security) the entry has to be deleted.
 : Delete the ECL (execution control list) of the user.
 : You have to choose which parts of the ECL (Workstation security, Java applet security, JavaScript security) will be deleted.
Execute Scripts : Notes Agents

 : List of agents to launch when applying the Profile on the desktop (Full mode or Silent mode). In some cases, it is more straightforward to write a LotusScript agent performing a series of modifications than to use sequential tasks. Agents to be run must be located in the DskMgr.nsf database and signed by an ID compatible with the ECL of the desktop where the agent will be run.
 : List of agents to launch when applying the Profile on the desktop, but only when the process run in Full mode. This is convenient to launch long duration agents (databases compaction, migration of data...).
 : List of LotusScript agents running in background (launched by the DskMgrTask.exe) after the audit step. These agents MUST NOT use functions coming from the UI class (UIWorkspace, UIDocument...).

 : List of agents located outside of the Desktop Manager database you want to launch when the Profile is applied (the option Full Mode only let you run the Agent only if the Profile is applied in Full Mode). You can use a Replica Id or a database name. You can specify several server names so Desktop Manager will run the Agent on the first one which is ready.
Execute Scripts : Exe Files

 : List of the executable files (or command file) to be run on the user desktop. There are two run types available : a sequence run (Sequence) that processes the various programs one after the other, waiting for the end of the previous one to run the next one, and the detached mode (Detach) that runs all programs in parallel. The Sequence mode blocks the execution of the Desktop Manager application (it has to wait for the end of the execution to go on) where as in Detach mode, it can go on immediately. If the path of the Exe file you want to run contains space characters (c:\Program Files\...\my_exe param_1 param_2), think about adding some quote ("") around ("c:\Program Files\...\my_exe" param_1 param_2).

 : Launch in background any Notes related programs, like local administration Tasks (compact, convert, fixup, update...) available on the user's workstation. If you don't want to wait until the Task is completed, let the Timout Delay field as blank. If you need to wait for the Task to be completed before continuing the Desktop Manager execution, populate the field with a maximum timout delay in seconds (like 300 = 5 min). So the Task will run and Desktop Manager will wait for its completion. After the Timeout delay, if the Task is still running, Desktop Manager will continue its execution without waiting anymore. If the Task completes before the reach of the Timeout delay, Desktop Manager will continue its execution right after the end of the Task.
Execute Script : Pre-Session Scripts
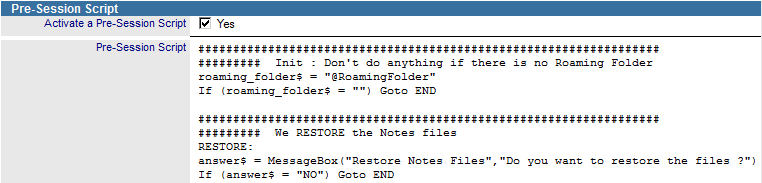 : The Pre-Session Script is a command file (DskMgrPre.ini) processed by the Hook component, at Notes Startup, before the password prompt. This script is usually set up for roaming purposes, in order to copy the Notes user files (names.nsf, bookmark, workspace, id file, notes.ini...) into the Notes Data folder, before the Notes program use them. This script is running in the context of the Notes client, so it can use functions modifying the Notes resources (change Notes.ini file variables, creation / modification of Notes documents into Notes databases...). To get more information regarding Script files, read the documentation 5.2- Create Scripts using Desktop Manager Script API functions.
Execute Script : Post Actions
 : Post Actions are usually commands (copy, delete, ...)done on files awaiting for the end of the Notes session to be executed by the DskMgr.exe. Actions will be executed by the declaration order of the Profile.
Post Actions available are:
| Copy File | File Copy | ||
| Move File | File/Folder Move or File/Folder Rename | ||
| Delete File | File(s) Delete | ||
| Zip File | File compress into Zip format. | ||
| Unzip File | Unzip a File | ||
| Modify File | Modify File Content (search and replace a string having the same character number, from a text or hexa ascii format) | ||
| Create Folder | Folder Creation | ||
| Delete Folder | Folder deletion (and if needed, the content of it) | ||
| Mount Volume | Mount a File Volume | ||
| Run Sequence Program | Execute a program and the Task is await for the end of the process | ||
| Run Detach Program | Execute a program but the Task is not waiting for the end of the process |
Execute Script : Post-Session Script
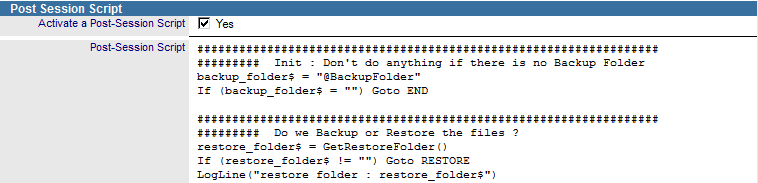 : The Post-Session Script is a command file (DskMgrPost.ini) executed by the DskMgr.exe, after the end of the Notes session, and execute commands from the DskMgr.ini (post actions) file. This script is usually used for backup user files (names.nsf, bookmark, workspace, Notes id, notes.ini...) into a dedicated folder. This script is executed after all modification done by Notes processes, so files are in a stable state and can be moved without any risk. As this isn't an active session when the Post Script is running, it's not possible to call Notes functions. For further information, see documentation : 5.2- Create Scripts using Desktop Manager Script API functions.
Files on Disk

 : List of the files to detach on the user desktop. As these are not necessarily Notes files, absolute file paths should be entered. They can be command files (.bat) that will be run afterwards using the module described below.

 : List of the local files we want to upload into the Desktop Manager database. If the specified file is found on the user hard drive, a File document will be created in the Desktop Manager database, part of the user's Audit Results documents. It is possible to ask for a file compression (Zip) for the copy stored in Desktop Manager database, in order to limit the size of the file.

 : Copy an existing local on the user's workstation.

 : Copy a set of files available in a Source folder (Source Folder Path) to a destination folder (Destination Folder Path). You have to specify the list of the files or folders to copy (wildcard character '*' may be used) and, if needed, the list of files or folders NOT to copy (wildcard character '*' may be used). If you check the option 'Process Sub Folders', the search for the file to be copied will be performed in all the sub-folders of the Source folder. In this case, the files folder tree will be re-created under the Destination folder.

 : Synchronize a set of files available in a Source folder (Source Folder Path) to a Destination folder (Destination Folder Path). You have to specify the list of the files or folders to synchronize (wildcard character '*' may be used) and, if needed, the list of files or folders NOT to synchronize (wildcard character '*' may be used). If you check the option 'Process Sub Folders', the search for the file to be synchronized will be performed in all the sub-folders of the Source folder. In this case, the files folder tree will be re-created under the Destination folder. The files available in the Source folder will be copied to the Destination folder only if the latest modification date of the Source file if greater than the Destination file (Source file modification date > Destination file modification date).

 : Zip a set of files available in a Source folder (Source Folder Path) into a Zip file (Zip File Path). You have to specify the list of the files or folders to zip (wildcard character '*' may be used) and, if needed, the list of files or folders NOT to zip (wildcard character '*' may be used). If you check the option 'Process Sub Folders', the search for the file to be zipped will be performed in all the sub-folders of the Source folder. In this case, the files folder-tree will be re-created within the Zip file.

 : Move or Rename a File or Folder on the user's workstation.

 : List files to remove from the hard disk of the user's computer. If the file cannot be removed immediately (if it is in use by Notes), it will be removed later on, via executable DskMgr.exe and the command file DskMgr.ini. It's possible to use the character * to delete more than one file (example : %TEMP%\DskMgrLog*.txt).
 : Create a folder on the user's workstation.

 : Delete an empty folder on the user's workstation. The option "Empty Directory" allow you to purge the content of the folder before his deletion.
Registry

 : Windows Registry keys to be modified. If the name of the key is empty (Key Name), the default value of the sub-key will be modified. If the sub-key or the key doesn't exist, it will be created. The data types available are the following:
| REG_SZ | String | ||
| REG_EXPAND_SZ | String containing some Windows environment variables (%USERPROFILE). | ||
| REG_DWORD | Integer number (write using decimal format) |

 : List of Registry keys we want to delete.
3. Wizard interface usage |
|
|
In order to simplify the enter of mandatory parameters (options list, target documents...) required by Profile documents functions, you have sometimes to use a Wizard interface by clicking on the  button. A window is displayed on the screen:
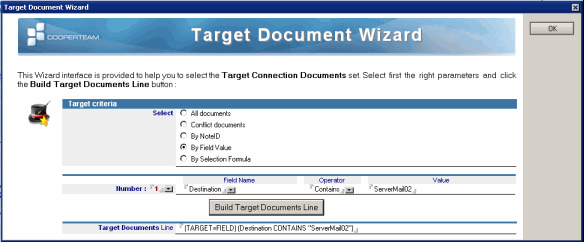
The kind of Wizard window displayed on the screen will depend on the parameters required by the function (NAB documents selection, Mail database documents selection, database properties, replication options, ECL options...).
All Wizard interface windows work on the same principle:
- Start by choosing the wizard options (database property, replication options...) or the way in which the documents will be selected (documents selection):
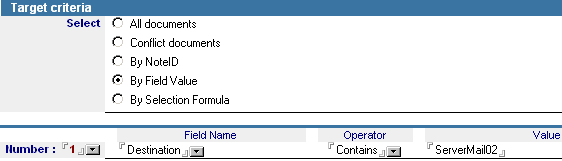
- Following the above click on the
 button in order to create command line which represents the selections made above:

- Close the Wizard window using the following
 button. This transfers the command line into the field of the Profile document:

4. User / Profile association |
|
|
There are several ways to set one or several Profiles to a user:
- By opening User documents and modifying the Profile list directly in the appropriate field:
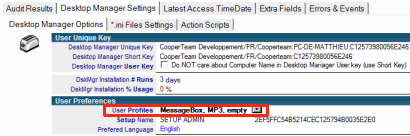
 : We set the Profile names in the order they will be applied on the Notes configuration.
- By using the
 button from view Notes Configuration / Profile / Profile Assignments:
Once the User documents are selected in the view and the action button is activated, required Profile document(s) should be selected via a dialog box :
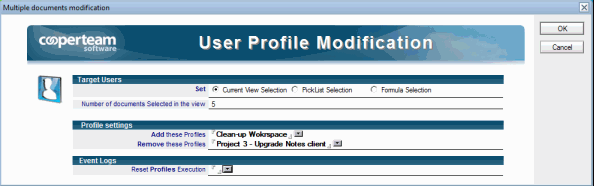
 : List of Profile documents we want to add to the already existing ones.
 : List of Profile documents we want to remove from the user's Profile list.
- By using the
 button available in every view displaying User document:
Once the User documents are selected in the view and the action button is activated, required Profile document(s) should be selected via a dialog box:
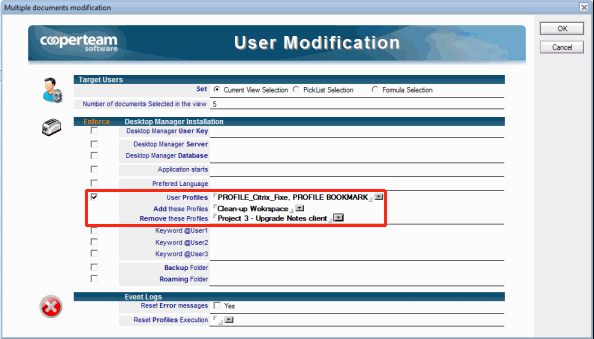
 : Exact list of Profile documents the User should apply (erase previous one).
 : List of Profile documents we want to add to the already existing ones
 : List of Profile documents we want to remove from the user's Profile list.
- Through the Setup documents linked to the user:
 : If the Precedence is set to User, the list of Profile documents from the Setup is used to initialize the user's Profiles list the first time he will connect the Desktop Manager database. After this first time installation / initialization, the user's Profiles list can be modified and the Setup Profile list won't be used anymore. It is a one-time usage only.
 : If the Precedence is set to Setup, the list of Profile documents from Setup will be used as Profiles to be applied to the user. Even if the administrator tries to remove them manually from the User document, they will come back. You may add extra ones but the Setup list will be always there (at the top of the list). You may also define a Profile list to be removed (in order to clean unwanted pre-existing Profiles). These Profiles will never be applied to the user because the Setup has the priority over the Profiles list the administrator might apply manually.
5. Using %, # and @ keywords |
|
|
With Profiles, the @ (Notes values), # (Notes.ini variables ) and % (environment variables) keywords may be used in all Template document fields or in all option values managed from the Profile document. When the Profile is applied on the user desktop, these keywords are replaced by real values that are mostly extracted from the user's Person entry in the corporate address book (for @), Notes.ini variables ( for #) and from environment variables of the desktop user session (for %). Unlike Tasks that can be individual, the universal nature of the Profile document and of its attached Templates makes it compulsory to use generic keywords.
See the following sample, to create a local replica of user's mail file, you should complete the fields as below:

@MailServer matches with the Servername of the user and @MailDbName is the filename path on the server. In the MailCooper\ folder of the local workstation (under the Data directory), the server Mail file will be replicated locally and it will keep the same Filename path (@MailFileName).
However, instead of using the database filename (into all Profile fields) , you can also use the Replica ID of the database, like:

Comments
0 comments
Article is closed for comments.