
 |
 |
1. Overview |
| 2. Creating a Report Template | ||
| 3. Word Template Reports | ||
| 4. Excel Template Reports | ||
| 5. Building Report Documents |
1. Overview |
|
|
 Back to Top
Archive Mail has a module for generating reports as Word or Excel files. It gives an overall view of the information contained in the Database documents.
Using a format such as Word or Excel allows the printing of the document without loss of quality. The creation of these reports can be manual or automated (scheduled) and their diffusion is made either by sending it by mail or by publication in a third database.
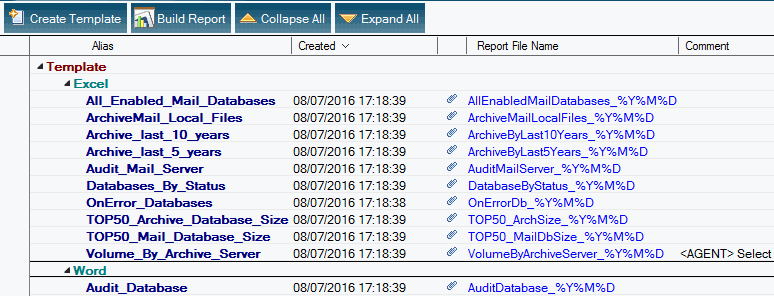
Customizing Reports provided with the application or creation of new reports is done by manipulating Report Template documents located in the Administration / Reports / Template view:
2. Creating a Report Template |
|
|
Creating a Report Template allows you to specify a set of information to be displayed in a report (Word or Excel). ArchiveMail embeds sample reports allowing you to understand the operation and capabilities of Reporting. To create your own report, please click the button  in Administration / Reports / Template view.
A Report Template document contains seven tabs : Main, Data Origin, Scheduling, Delivery Options, Appearance, @Formula Repository and Actions List, as shown below. Each tab is explained above (click each Tab for details):
Main
The Main tab contains the essential information such as the report name (Alias) , the comment field can help to customize the report without displaying it on the generated report.
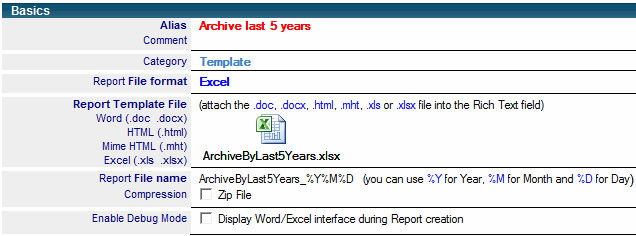
The Report Template File field contains the attached template (Word , Excel) without the data. When the report is generated, the file is used to be filled with all the information requested using keywords, such as graphs, tables and text.
The Report File Name field is the name of the final report file. The report is generated manually, the date and time are usually displayed dynamically using the following keywords: %Y (for year) %M (month) and %D (current day). Example, the file named TPLTop30_2YActivity_%Y%M%D become the TPLTop30_2YActivity_20150419.doc report if it is generated on April 19 th, 2015.
The Report File Format field must be exactly the file extension attached. If the option Zip File Compression is selected, the generated report will be zipped before being attached to the result document.
Data Origin
The Data Origin tab allows the selection of the documents retrieve from Application Database that will be inserted in the final report. Word Reports usually use 1 or 2 documents as Data source where Excel Reports can get thousand.
For Word Templates, it is individual links to documents:

For Excel Templates, it is @Formula:

Delivery Options
The Delivery Options tab allow the diffusion option of the generated report:
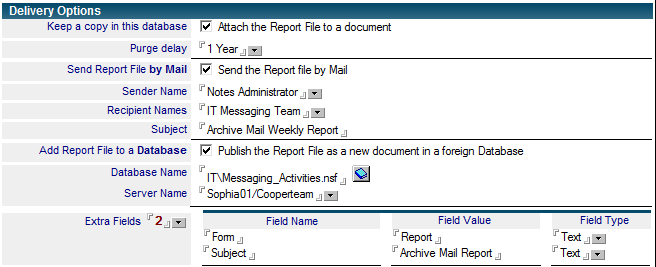
If the Attach the Report File to a document option is selected, the final report is attached in a new document created in the ArchiveMail database in the Reports / Report Document view. Reports documents can be automatically deleted via the Purge delay field.
In addition, the report can be automatically sent via the Send Report File by Mail option. In this case, please, fill in the Sender Name, Recipient Names and Subject to enable the sending of an email with the final attached report (groups are allowed as the Recipient Names is a multi-value field).
Finally, the final report may also be published in a new document in a third database. If you need additional field in the document, you can select the number of fields and the appropriate values in the Field Name, Field Value, and Field Type fields in the Extra Fields section.
Appearance
The Appearance tab allows to change the separator used in the reports:

The Regional Settings section allows to specify the decimal separator (Decimal Symbol) and the digit separator (Digit Grouping Symbol) for formatting numbers in reports.
Note: This tab is not available when you generate reports as Excel.
@Formula Repository
The @Formula Repository tab is used to keep the template file as simply as possible. So, You can drop off your @Formula in this tab and report only the number of the @Formula field in the template file. For example, insert [#1] in the template file to display the formula result when the report get built:

When generating the report, the Tag [#1] will be replaced by the evaluation of the @Formula of #1.
Note: This tab is not available when you generate Excel reports.
Action List
The Action List tab is only available for reports as Excel. It allows the creation and management of additional rows and columns to simplify the generation of a report. The Compact option is used in the Reports as the Categorized rows in the views : You only keep 1 sample of each unique value of a data set.
Example : in the Data Origin tab (2nd tab of the Report Template document), you specified in the last section that the column containing the label [SERVER_NAME] show the result of the formula filled in @Formula field, but also adding the Action Unique_case, as below:

In the Action List tab, you refer the name of your action in the Action Name field, and then have the ability to set automatic actions for the following Rows and for 3 following Columns. In the example below, the lines are set to the number of 11 (Top 10 + Extra line), with two additional columns: the first (#+1), shows the number of Database documents matching the value of the [SERVER_NAME] column (SCORE) and the second (#+2) displays the result of @Formula (DBSize/1024):
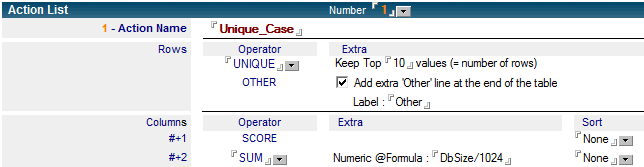
Note: By selecting NONE in the #+3 field of the Operator option, the 4th column is inactive.
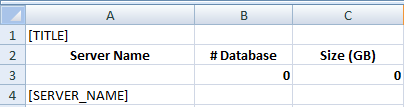
In Excel Template File:
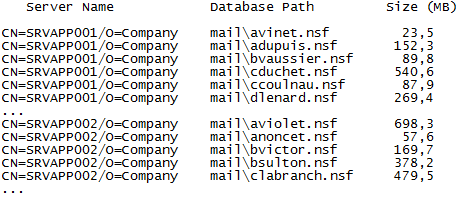
Raw Data from the Application Dashboard database;
Once the Compact + Action applied:
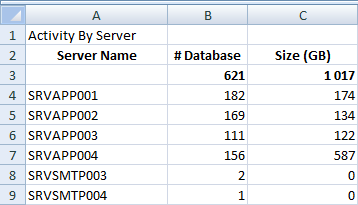
Column Server Name keeps only one sample of each individual Server name (UNIQUE), # Database Column displays the number of Databases (SCORE) having this Server Name and Size (GB) Column is the SUM of all Database Size having this Server Name.
3. Word Template Reports |
|
|
To create a Word report, please select Word from the Report File Format field, then attach a Word file in the Report Template file field. It is probably easier to start with a sample Word file provided with the product and modify it for your own needs. Word or Office 2003 (or later) must be installed on the computer where you build the reports.
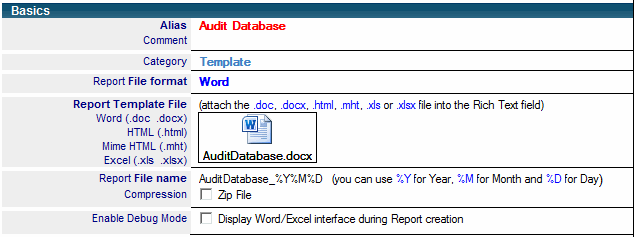
In the second tab called Data Origin of the Report Template, you must select the Number field, you specify the number of documents to select and Document ID allows the selection of audit document on which you want to extract information displayed in the final report.

Example :
Below is a Word Template sample. The report engine will automatically replace the data between bracket ([DB_Title], [DB_Path], [DB_Server], [@Text(DB_Created)]...) by their value (field value or @Formula computation) and create the final Word Report. If the @Formula are too long to feet on the Word Template, you can use the @Formula Repository tab to write them and use keywords [#1], [#2], [#3]... as reference.
The Word Template:
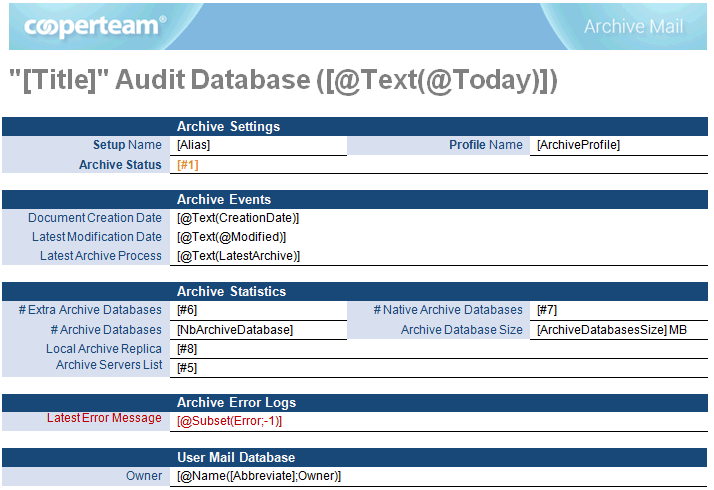
The Word Report:
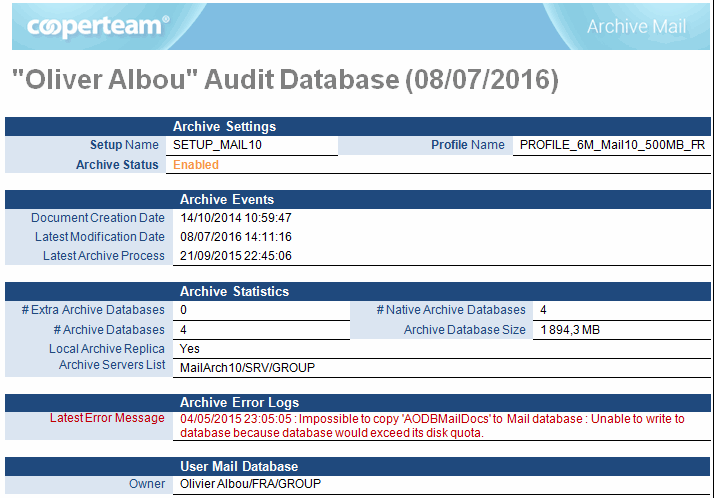
4. Excel Template Reports |
|
|
To create a Excel report, please select Excel from the Report File Format field then attach an Excel file in the Report Template file field. It is probably easier to start with a sample Excel files provided with the product and modify for your own needs. Excel or Office 2003 (or later) must be installed on the computer where you generate reports.
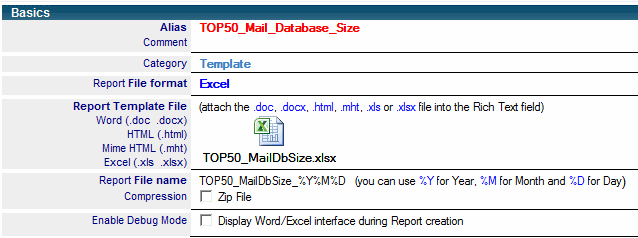
Excel format is a good choice to create Report displaying values coming from several Database documents (Audit Result). The Data Origin tab gather all data definition.
 The Data Origin section contains the selection @Formula defining the list of Database documents used to create the Report:

The Excel Data Cells section is used to define Cell values not related to the Database documents previously selected. The [TITLE] tag can be used to add a Title to the Excel file, the [COUNT] tag can be used to display the number of Database documents retrieved be the @Formula (or used to compute %). Extra Cell are used to compute any other kind of value (current Time / Date, Report creator name, ...):

The Excel Data Rows section lets you limit the number of Database documents results displayed in the Report document (Maximum Number of rows: 30 rows) and give you the possibility to sort your columns (Ascending or Descending). If you combine both, you can easily build TOP 100 reports, where you extract only the first 100 Database documents (base on a specific criteria).

In the Excel Columns @Formula section, you define the list of [Tag] name found in the Excel Template file and their value (defined as Field Name or @Formula computed from the Database documents):
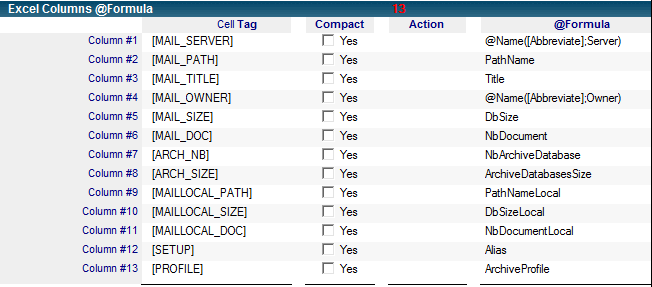 You can use Action facility to build compact style data. See Reporting : Creating a Report Template for more details.
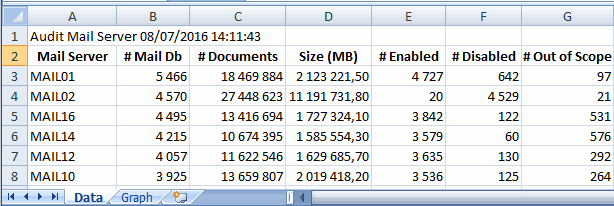
You can also use Excel Graphic facility to pump data from Database documents and push them into Excel file (in Sheet #1 Data):
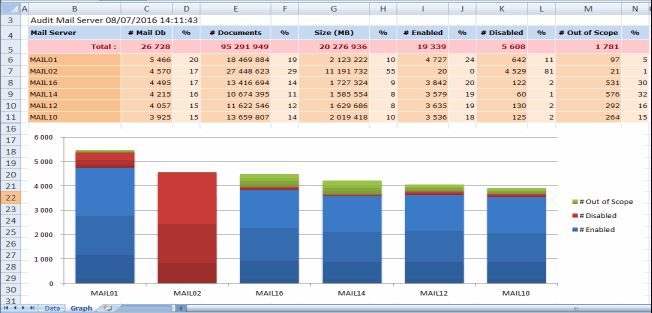
and have the graphics automatically build in Sheet #2 (Graph):
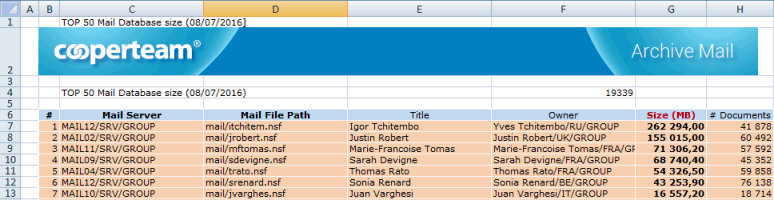
Excel Report Example:
Here is an Excel report sample with the final generated report. The cells from the template document show the keyword content as [DATABASEPATH], [SERVERNAME], etc., allowing the report engine to replace these keywords by their values. In general, the report engine calculates the values of the @Formula fields first, and then process the Excel report to search the suitable space to insert data. Each row of the Excel Report File contains value from one Database document.
In the Excel Template:
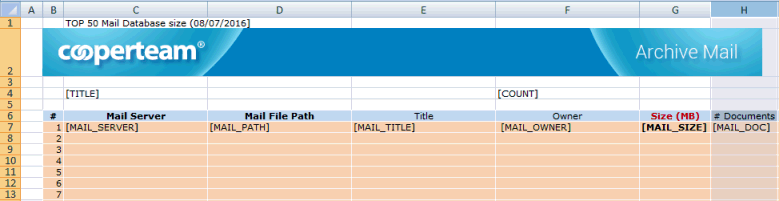
In the Excel Report:
5. Building Report Documents |
|
|
Open the Administration / Report / Template view, select the reports to be created and click the  button. There is no need to install any additional software, since the
  button takes care of this automatically. The binaries are installed in the Data directory of your Notes client in the CTReport\Files\ReportFile\ sub-directory.
The following message lets you know that report creation is in progress in the background:
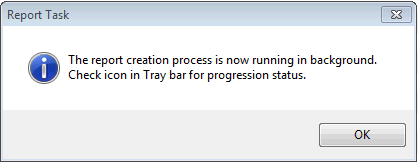
and the  icon in the notification zone of your Windows Task bar indicates its progress. You can also go to Administration / Reports / Report view and wait for the Report document to become available. Sort the view by clicking the Created column, and your document should be on the top.
Creation of Reports on Server (Scheduled)
In order to schedule reports creation on a Domino server (Windows only), you need to ensure that the Microsoft Office tools Word and Excel are installed on the server. You should also ensure that the authority under which Domino is running has access to this software on the server.
You also need to install Application Dashboard Reports components on the Server. The easy way is to run the Report on your local PC and copy the whole CTReport\ folder content from your PC (located in Notes Data directory) to the server (also in the Domino Data Directory). If you dig into the folder, you will find there executable files like MailFlowTag.exe, MailFlowTagHTML.exe, MailFlowReportHTML.exe and MailFlowReport.exe. The other file to be installed is the ReportTask.exe Add inTask. You will find it in the Installation / Install Files view of the Archive Mail database, in the Report Task document. Make sure you pick up the right one, depending on your Domino Server architecture (32 bits or 64 bits). The ReportTask.exe file has to be installed in the Domino Program directory,
Finally, you should create a Program document in the Domino directory of the server to launch the ReportTask.exe with the right Report name:
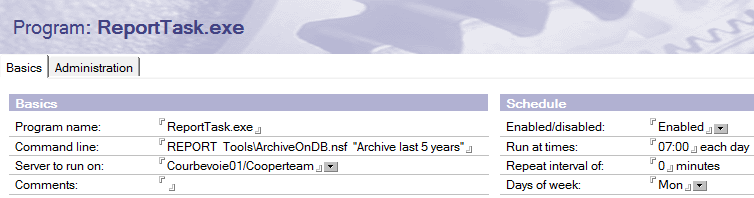
The Program name is the Task which creates the reports (ReportTask.exe) and the parameters includes the REPORT keyword, the path of the Archive Mail database and the name of the Report Template to create.
Creation of Reports based on LotusScript Agents
There is one Report Template in the Archive Mail database that require special operation to be built:
- Volume By Archive Server
Instead of using the  button from Administration / Reports / Template view, you need to select the Template document from the view and launch the related LotusScript Agent from Actions menu:
- Create Report 'Volume By Archive Server' for Report Template Volume By Archive Server
The agent will process the Template and will create the Excel file Report.
Viewing the Report document
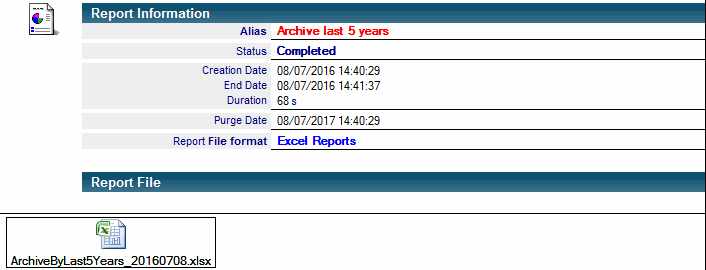
Once the report has been generated, you will find a new document in the Administration / Reports / Report view, containing your report, as follows:
Trace Files
During the background creation of a report, temporary files (Value_pid.txt, Template_pid.xls, Report_pid.xls...) are created in the Notes Data directory, in the CTReport\Files\ReportFile\ sub-directory. These files are deleted once the report has been created.
In addition, the Trace files for the report creation process are generated in the %Temp% directory of the machine and are called ReportTaskLog_yyyymmdd_hhmmss_pid.txt and MailFlowReportLog_yyyymmdd_hhmmss_pid.txt. The Temporary files and the Trace files can be used to analyze the problem if reports are not built as expected.
Troubleshooting
If you can't get your report created, the first thing to do is to have your report created on local (on your PC). It is easier to debug. You can access the Trace file, look at the temporary files and make sure Excel or Word work fine.
If the problem seems to come from Word or Excel, you can click the Enable Debug Mode option in the Report Template:
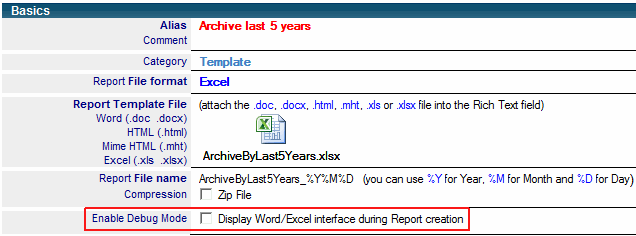
This will force Word or Excel to be displayed on the screen during the Report creation. If an error message is pop up, you will see it. Common errors messages come from Excel or Word file formats. Make sure you use the right extension (like .xlsx or .docx) if you are using the latest Word or Excel release (and not .doc or .xls) in order to prevent any warning messages asking if you want to enable compatibility mode.
If the Report works fine on local, but do not work on Server, check the following common errors list:
- Check the CTReport\ folder is available in the Server Data directory, with all required files inside.
- If the Domino Server is 64 bits, use ReportTask.exe in 64 bits. If Domino Server is 32 bits, use ReportTask.exe in 32 bits.
- Make sure Excel & Word have been installed and started at least once. During the first start-up, they end-up their installation by initializing many things.
- If the server is running Windows 64 bit, make sure the following folder exists: "c:\Windows\SysWOW64\config\systemprofile\Desktop\". If not, create it.
Comments
0 comments
Article is closed for comments.