
 |
 |
1. Install Road Map |
| 2. Installing application on Server | ||
| 3. Installing local components | ||
| 4. User Communication |
1. Install Road Map |
|
|
 Back to Top
To successfully install ArchiveMail on your messaging infrastructure, follow this quick walk-trough. To get more detailed explanations, read the dedicated chapter in the documentation.
Here is the step-by step guide :
Step 1 : Install ArchiveOnDB database on the Archive server
Copy the Notes database ArchiveOnDB.nsf on the Archive Domino server and perform the common administration tasks (Signature, ACL...).
Step 2 : Install ArchiveOnDB executable on the Archive server
Extract the ArchiveOnDB.exe binary file (can get it from Installation / Install Files view of ArchiveOnDB.nsf database) on the Domino server, in the Domino Program directory.
Step 3 : Create a Activation Key document (only if an activation key was provided)
If an activation key was provided, you have to create an Activation Key document in the ArchiveOnDB database ( from Installation / Activation Key view).
Step 4 : Create a Setup document
Create a Setup document in ArchiveOnDB.nsf database (Administration / Setup) to define the Mail databases set you want to archive (i.e mail\*.nsf).
Step 5 : Run the Task and check the creation of Database documents
Run the ArchiveOnDB.exe Task for the first time (use the Run button from the Administration / Setup view). The program will gather all the databases that could be archived, and will create for each one a Database document. These documents are available in the Mail Database views. To check the Task status, use the Administration / Task Status view (green = running, red = stopped).
Step 6 : Create a Profile document for archiving
Create a Profile document (from Administration / Profile view) to define the archiving parameters (server name, archive databases path, documents to archive, ...). You can create as many Profile documents as you want to suit every need.
Step 7 : Select a test user and apply a Profile
From the Mail Databases / By Mail Server view, select a test user via his Database document. Apply a Profile by using the Set Profile button. Change the Status of the document by using the Change Status / Enable Archive process button (if the Key word %USER% has been used in the Profile document, you have to enter the value for the Database document).
Step 8 : Run the Task and check the Archives creation for the test user
Run ArchiveOnDB.exe Task for a second time. The application will update the Database documents (by analyzing the Mail databases available in the focus folder) and will process all the documents that have a Profile defined and an archiving status set to Enabled. The application will create the archive databases according to the Profile options and will transfer the documents into the archive databases. It will also create links in the Mail database to let the user access the archive databases.
When the run is done, check if archive entries have been added in the Database document and if the statistics (number of mails archived...) have been built. You can find process details in the Log tab of the Database document.
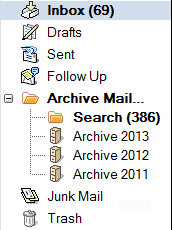
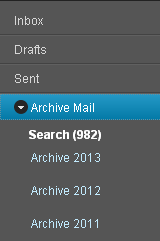
Open the Mail database of the test user, and check if there are links toward Archive databases (2011, 2012, 2013...) :
Step 9 : Expand the test
If everything is running fine, expand the test process to a first user group. You just have to apply them a Profile and change their archiving status to Enable. Running the Task will create the archive databases and links toward it.
Step 10 : Schedule the execution
Create a Program document in the server's NAB to run the ArchiveOnDB task on schedule (i.e once a week)
Based on which extra options you want to enable (multi-databases Search, iNotes access...), you may have to perform few next steps :
Option 1 : Install iNotes specific components for ArchiveOnDB on Mail Servers
If the users accessing to their Mail databases using iNotes want to access their Archive databases and perform multi-databases search from the iNotes interface, some iNotes specific components have to be deployed on Mail Servers. The restart of the HTTP Task on Mail Servers is mandatory to activate such components.
Option 2 : Install multi-databases Search Library on Mail Servers
Extract the Library CTSearchLib (located in the Installation / Install Files view of the ArchiveOnDB.nsf database) to the Domino Program folder, for all Domino servers hosting Mail databases. If Mail servers are clustered, the Library has to be installed on all members of the cluster. The restart of the Domino Mail server is mandatory to enable the search module. However, you can and up the install of ArchiveOnDB components and restart the Mail Severs later. The multi-databases Search facility will be enable after the restart of the Mail servers.
Option 3 : Install local replicas of Archive databases on Users PC
If the user has a local replica of his mail on its PC, you can configure Archive Mail to automatically deploy on local PCs the local components used for :
- Creation of local replicas of Archive databases
- Multi-databases search module (searching in local replicas or in the server databases)
- Audit of Notes configuration
The restart of the Notes client is mandatory to activate the components (CTSearchLib.dll + CTSearchTask.exe).
2. Installing application on Server |
|
|
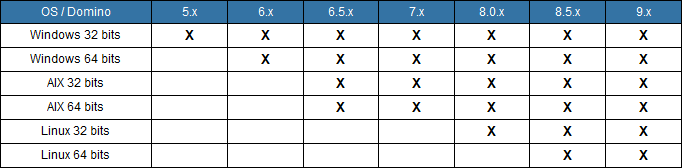
ArchiveMail (also called ArchiveOnDB) can be installed on any Domino server (ArchiveOnDB.nsf database + ArchiveOnDB.exe Task) of the company. Here are the Domino's server supported versions, by OS :
Users can access their Archive Databases from their Mail File by using either a Notes Client (Windows or Macintosh) or iNotes. The following tab shows the supported access modes :

It is possible to install the application either on the same Domino server as Mail databases, or (preferably) on a dedicated Archive server, which would prevent overloading the Mail server.
If the installation is done on an Archive server, you must check the Archive server ID's access right (must be Manager) to grant it access to the Mail server.
Here is a list of components that must be installed:
Installing ArchiveOnDB.nsf database
In order to install ArchiveOnDB.nsf on the server, go through these steps :
- Copy ArchiveOnDB.nsf database on the domino server. You can copy it wherever you want under the server Data directory.
- Sign database with the usual Signer ID or the server ID.
- Modify the ACL to restrict access to authorized persons only.
- If you have an Activation key, create an Activation key document from the view Installation / Activation key view and enter your key.
Installing ArchiveOnDB.exe executable
In the Install Files view, identify the document that suits your Operating Systems (Windows, Unix, 32 bits, 64 bits...), and extract the ArchiveOnDB.exe component included in the document. Copy it in the Program directory of the Domino server (same directory as nserver.exe). On Unix, think about applying the expected rights to the file (chmod, chown).
Installing the Search Module
Installing on the Mail servers the multi-databases Search Library
ArchiveMail on DB provide a multi-databases search function, which allow a user to request a search in all its archives on one run (a typical user will have one Archive per year). The search request can target other user's Mail databases or Archives, if they opened access on their Notes databases.
This multi-databases search engine is a Notes DLL loaded in memory by the Domino server. The objective of this component is to detect any search request issued by the user from its Mail database and perform it. The search result is published in a dedicated folder, in the user Mail database.
To install this component on Domino Mail servers, proceed as follow :
1 - Open Installation / Install Files view from ArchiveOnDB.nsf database and look for the CTSearchLib document that suits your server Operating System (Windows, Unix, 32 bits, 64 bits...).
2 - Extract the CTSearchLib.dll component from the Install File document and copy it to the Domino server hosting the Mail databases, it in the Program directory folder (same directory as nserver.exe).
3 - Modify the Notes.ini file by adding the name of the component after EXTMGR_ADDINS=. If this line doesn't exist, just write it. If there is other values on the line, use a comma as separator, as follow :
EXTMGR_ADDINS=CTSearchLib.dll
or
EXTMGR_ADDINS=MailFlowLib.dll,CTSearchLib.dll
4 - Turn on the Domino server. This step is a MUST DO, it allow the server to take into account the new component.
The following message will be displayed on the server's console (at startup time) to show that the DLL has been loaded :
ArchiveMail on DB : Search Library 3.0 is attached to 'nserver'.
ArchiveMail on DB : Search Library 3.0 is attached to 'nhttp'.
Configuring iNotes Access
Installing on the Mail servers the components for iNotes 8.5.1 (or higher) access
If users must access their Archives databases from a iNotes 8.5.1 browser, you have to install dedicated components in iNotes\Forms85.nsf (or iNotes\Forms9.nsf for a server 9). The deployment of the iNotes components is automatic if you have checked the option in the Setup document. So, you have nothing special to do except Step 4 : Finalization. The install takes place at ArchiveOnDb.exe Task startup time. If, for access or security reason, the Task can't deploy the iNotes components on the Mail server, do it manually :
For each Domino Mail 8.5.1 (or higher) server hosting mail databases archived by ArchiveMail on DB, proceed as follow :
1 - iNotes access
- Open iNotes\Forms85.nsf (or iNotes\Forms9.nsf)on the involved Domino Mail server.
- Make sure ACL is set at Designer level or above.
2 - Install FormMap components
- Open ArchiveOnDB's Install Files view
- Open iNotes Components category, select all documents.
- Paste them in iNotes\Forms85.nsf's (or iNotes\Forms9.nsf's) System\Forms view.
3 - Design elements deployment
- Open ArchiveOnDB.nsf in the Designer.
- Access design elements Subforms.
- Copy/Paste the following subforms s_AODBDocRead, s_AODBDocRead_Init, s_AODBDocDictionary, s_AODBDbRead, s_AODBDbRead_Init, s_AODBDbDictionary on the design of iNotes\Forms85.nsf (or iNotes\Forms9.nsf) database.
4 - Finalization
- In the Server's Notes.ini file, add the line iNotes_WA_EnableActionsInArchive=1 (enables menu actions Reply, Reply to All and Forward)
- From the server's console, launch the HTTP task or type the command tell http inotes flushforms.
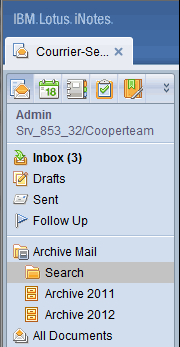
- Try to access to a Mail database using iNotes and check the ArchiveOnDB integration in the Outline (Archive Database + Search Folder) :
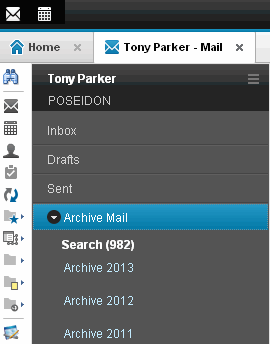
- Make sure that links to Archive databases are working and opening Archived documents using document links is OK.
Installing on the Mail servers the multi-databases Search components for iNotes 8.5.1 (or higher) access
If the users want to perform multi-databases searches from the iNotes 8.5.1 (or higher) interface, some components have to be installed in the iNotes\Forms85_x.nsf (or iNotes\Forms9_x.nsf for server 9) database of Mail servers (there is nothing to install in the Archive servers). Usually, the iNotes\Forms85_x.nsf (Lotus iNotes Extension Forms) database does NOT exist on the Mail servers, so the first thing to do is to create it. The next one would be to slightly modify its content.
To install components on Domino Servers running iNotes 8.5.1 (or higher) and hosting Mail Databases archived by par ArchiveMail on DB, proceed as follow :
1 - Creation of database iNotes\Forms85_x.nsf (or iNotes\Forms9_x.nsf)
- Check the existence of Template file named Forms85_x.ntf (or Forms9_x.ntf), usually located in the Data folder of the Domino Mail server.
- Create database iNotes\Forms85_x.nsf (or iNotes\Forms9_x.nsf) from this Template (beware about Uppercase / Lower-case under Unix).
- Make sure your ACL access level is at least Designer.
2 - Design elements deployment
- Open ArchiveOnDB.nsf database in the Designer.
- Access Design Elements Shared Elements / Subforms.
- Open iNotes\Forms85_x.nsf (or iNotes\Forms9_x.nsf) database in the Designer.
- Access Design Elements Code / Agents.
- Copy / Paste agents (AODB_RemoveAll_FR) and (AODB_RemoveAll_US) from ArchiveOnDB.nsf database to iNotes\Forms85_x.nsf (or iNotes\Forms9_x.nsf) database.
- Access Design Elements Shared Elements / Subforms.
- Copy / Paste subform Custom_JS_Lite_CT from ArchiveOnDB.nsf database to iNotes\Forms85_x.nsf (or iNotes\Forms9_x.nsf) database.
- Copy / Paste the Resources / Style Sheets AODB Style for Search form from ArchiveOnDB.nsf database to iNotes\Forms85_x.nsf (or iNotes\Forms9_x.nsf) database.
- Modify subform Custom_JS_Lite in the database iNotes\Forms85_x.nsf (or iNotes\Forms9_x.nsf) to add the following lines :
<InsertNotesSubForm Name="Custom_JS_Lite_CT">
Custom_Scene_Actions_Lite_CT(s_MenuID);
and remove comments around lines :
<InsertNotesSubForm Name=API_ActionsHelper_Subform_Lite>
<InsertNotesSubForm Name=API_Utils_Subform>
To understand where to perform such modifications, help yourself with subform Custom_JS_Lite available inArchiveOnDB database.
- Save subform Custom_JS_Lite and Close database iNotes\Forms85_x.nsf (or iNotes\Forms9_x.nsf)
3 - Installation of Dojo 1.9.7 on the Mail Server
- Get file dojoroot-1.9.7.zip available in document iNotes Components / dojoroot-1.9.7.zip, from view Installation / Install Files of ArchiveOnDB.nsf database.
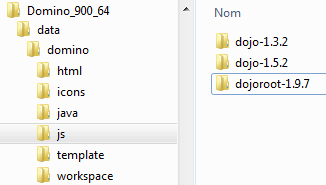
- Extract the content of the file into a folder named dojoroot-1.9.7 in the Data\domino\js folder of the Domino server :
4 - Finalization
- From the server console, restart HTTP Task (tell http quit and load http).
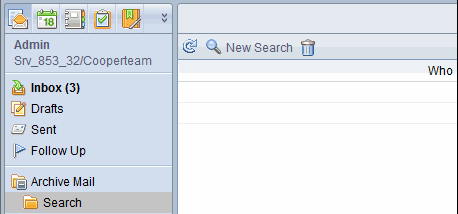
- Open a Mail database using iNotes access an go to Search folder (under Archive Mail). The button New Search should be available in the action bar of the folder :
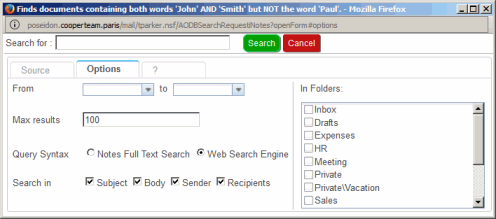
- By clicking the button New Search, the Search window should be displayed as it :
3. Installing local components |
|
|
If the user wants to have the Archive databases locally replicated and perform searches when he has no access to the archive server, he has to install on his local PC the Archive Mail local components. The following tab shows the supported type of clients :

The installation of these components on Notes clients can be done automatically :
1 - In the Profile document, check option Install Local Components in Local Installation.
2 - Run the ArchiveOnDb.exe Task at least once, in order to create the Search folder in the user's Mail File.
3 - When the user open the Search folder the first time, the components CTSearchLib.dll and CTSearchTask.exe are automatically deployed in the Notes Data directory of the Notes client and the Notes.ini line EXTMGR_ADDINS= is updated.
4 - After a restart of the Notes client, the local Search will be available. This step is a MUST DO, it allow the Notes client to take into account the new component.
If you want to speed up the installation of the local components, without waiting for the users to open the Search folder, you can use the two next options : User Communication and/or Mail Database Design Update.
Updating Mail Database Design
The default way to have the local components installed on the PC is to wait for the user to enter the Search folder of their Mail database. This may never happen for some users because they don't know about the Search folder or simply they do not care about searching in their Archive databases.
The other option is to modify the Mail database Design to add, into a well chosen element of the Mail database, the required code for the ArchiveMail local components installation (the same code we find in the search folder). Modifying Mail database design is complex because you may have a lot of different Mail Templates in the company (by Notes version, by language, by type of access...). So the easy way is to inject the code in a design element which is the same among all Mail Templates. For that, we have chosen to modify a Subform. It could be either $Moods, DelOptionInterim or DelOptionSubform. These subforms are linked to the Memo form which means they are called every time the user read or create a new message. They have no LotusScript code, so there is no risk of incompatibility with the code added into them.
In order to prepare the replacement of the $Mood subform (or any of the 2 others), you have to :
- Copy the $Moods subform from your Mail Template to the ArchiveOnDB.nsf database (using Notes Designer client)
- Transfer all the LotusScript code from the Search Folder (AODBSearchNotes) into the $Moods Subform. (QueryOpen + Globals)
- Sign the database with the right ID file (this code will run from User Mail File).
You need now to inject this modified Subform into the Mail database of the users. Open the Mail Databases / User Installation / Update Mail Design view, select the Database documents and click the  button. In the popup window, enter the name of the Subform you want to replace :
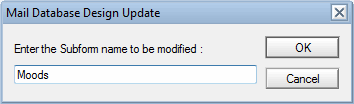
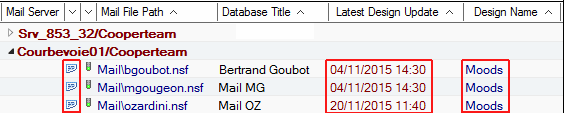
and click the OK button. All the selected Mail files will be modified. Once done, you can see in the Update Mail Design view which databases have received an update of their Design (), the name of the modified Subform (Moods) and the date of the update (04/11/2015 14:30) :
In the Database document, you can find these information in the Mail Database Design Update block of the Archive Events Tab :

4. User Communication |
|
|
ArchiveMail provides a User Communication module to send Email to the users. These emails can be used for information purpose (announcing the setup of a new Archiving solution) or to speed up the installation of the local components (a button in the mail where the user has to click to complete the local installation of the components). The communication module may also be used to ask question about to the user and catch the answer. This can be useful if we need first to get the agreement of the user before running the Archiving process on his Mail file.
The first step is always to wait for ArchiveMail to have run at least once on the Server to get in the ArchiveOnDB.nsf database all Database documents. Usually, every mail database has a owner (Mail In database or Shared Mail database don't). He will be the recipient of the messages.
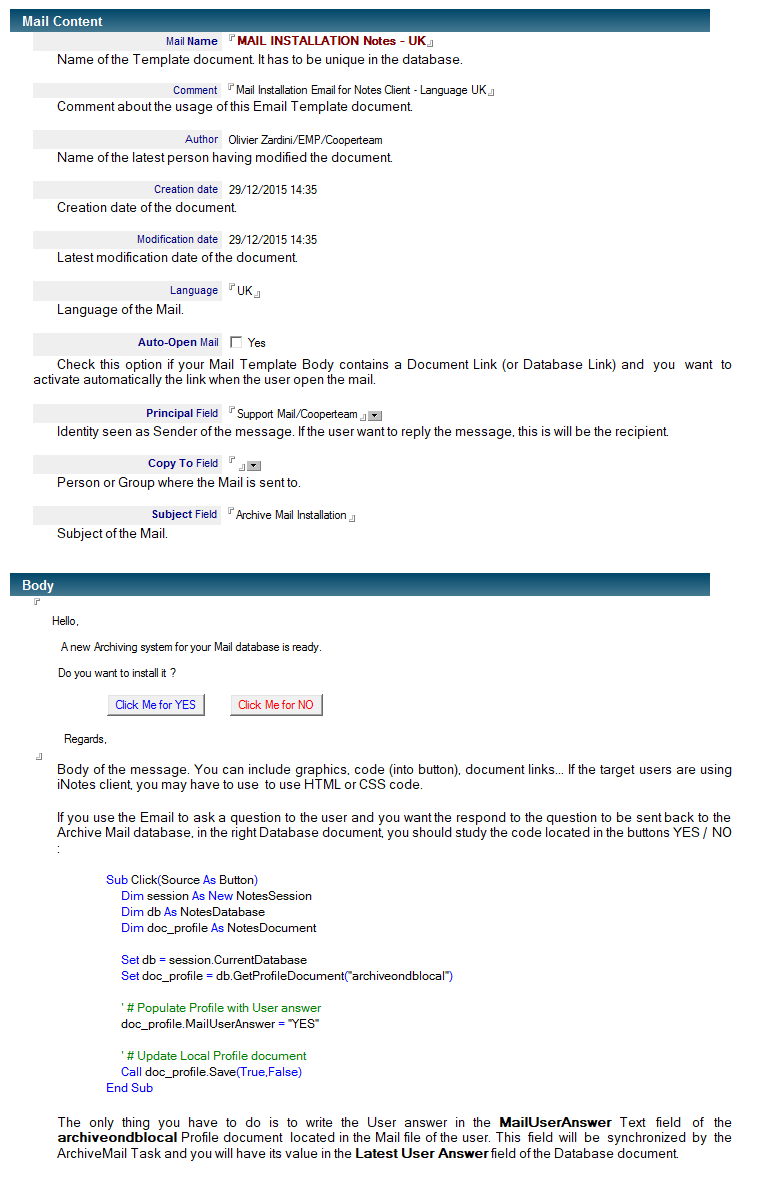
The next step is about creating Mail Template documents. Open the Administration / Communication / Mail Template view and click the  button. The Email Template documents use the following fields :
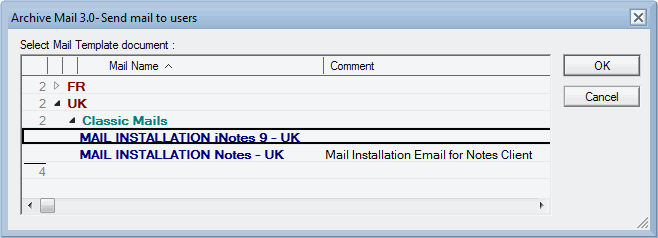
The last step is about sending the Email to the users. Open the Mail Databases / User Installation / Send Mail view, select the Database documents and click the  button. You simply have to pick up the Mail Template you wan to use:
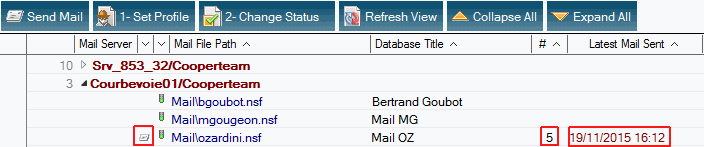
and the Email are sent to all the target recipients. From the Send Mail view, you can see who have already received a Mail ( ), how many mail have been sent (5) and the latest Mail Sent date (19/11/2015 16:12) :
In the Database document, you can find these information in the User Communication block of the User Events Tab :

Comments
0 comments
Article is closed for comments.