
 |
 |
1. Report Overview |
| 2. Creating a Report Template document | ||
| 3. Creating a Word Report | ||
| 4. Creating an Excel Report | ||
| 5. Running a Report |
1. Report Overview |
|
|
 Back to Top
Desktop Manager has a module for generating reports as Word or Excel files. It gives an overall view of the information contained in Desktop Manager.
Using a format such as Word or Excel allows the printing of the document without loss of quality. The creation of these reports is manual and their diffusion is made either by sending it by mail or by publication in a third database.
Customizing Reports provided with the application or creation of new reports is done by manipulating Report Template documents located in the Audit Results / Report / Report Setup view.
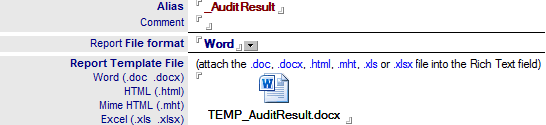
2. Creating a Report Template document |
|
|
Creating a report template allows you to specify a set of information to be displayed in a report (Word, Excel). Desktop Manager embeds sample reports allowing you to understand the operation and capabilities of Reporting. To create your own report, please click the button  in Audit Results / Report / Report Setup view.
A Report Template document contains six tabs : Main, Data Origin, Delivery Options, Appearance, @Formula Repository and Actions List, as shown below. Each tab is explained in detail later in this document.

Main
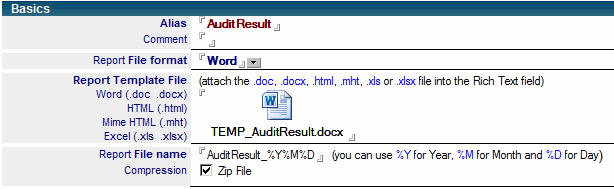
The Main tab contains the essential information such as the report name (Alias) , the comment field can help to customize the report without displaying it on the generated report.
The Report Template File field contains the attached template (Word , Excel) without the data. When the report is generated, the file is used to be filled with all the information requested using keywords, such as graphs, tables and text.
The Report File Name field is the name of the final report file. The report is generated manually, the date and time are usually displayed dynamically using the following keywords: %Y (for year) %M (month) and %D (current day). Example, the file named DesktopAudit_Week_ %Y%M%D become the DesktopAudit_20130419.doc report if it is generated April 19, 2013.
The Report File Format field must be exactly the file extension attached. If the option Zip File Compression is selected, the generated report will be zipped before being attached to the result document.
Data Origin
The Data Origin tab allows the selection of the data retrieve from Desktop Manager databases that will be inserted in the final report. The information displayed is always a Notes field extraction from Desktop Manager database documents containing Audit information, as the version of the Notes client, Notes client settings information, etc. Depending on the type of report (Word, Excel), you do not have to specify the same fields: Refer to the following Documentation documents for specific features linked to the report format.

Generating a report is a selection of existing information contained in the Desktop Manager databases. You can combine several types of documents in the same report (User and Notes Install documents).
Delivery Options
The Delivery Options tab allow the diffusion option of the generated report :
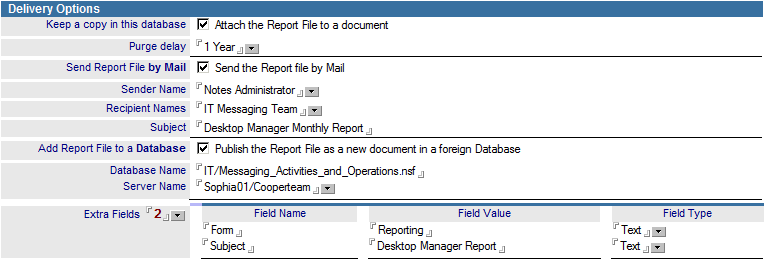
If the Attach the Report File to a document option is selected, the final report is attached in a new document created in the Desktop Manager database in the Audit Results / Report / Results view. Reports documents can be automatically deleted via the Purge delay field.
In addition, the report can be automatically sent via the Send Report File by Mail option. In this case, please, fill in the Sender Name, Recipient Names and Subject to enable the sending of an email with the final attached report (groups are allowed as the Recipient Names is a multi-value field).
Finally, the final report may also be published in a new document in a third database. If you need additional field in the document, you can select the number of fields and the appropriate values in the Field Name, Field Value, and Field Type fields in the Extra Fields section.
Appearance
The Appearance allows to change the separator used in the reports :

The Regional Settings section allows to specify the decimal separator (Decimal Symbol) and the digit separator (Digit Grouping Symbol) for formatting numbers in reports.
Note: This tab is not available when you generate reports as Excel.
@Formula Repository
The @Formula Repository tab is used to keep the template file as simply as possible. So, You can drop off your @Formula in this tab and report only the number of the @Formula field in the template file. For example, insert [#1] in the template file to display the formula result when the report get built.

Note: This tab is not available when you generate reports as Excel.
Action List
The Action List tab is only available for reports as Excel. It allows the creation and management of additional rows and columns to simplify the generation of a report.
Example : in the Data Origin tab (2nd tab of the Report Template document), you specified in the last section that the column containing the label [MAIL_SERVERS] show the result of the formula filled in @Formula field, but also adding the Action Unique_case, as below:

In the Action List tab, you refer the name of your action in the Action Name field, and then have the ability to set automatic actions for the following Rows and for 3 following Columns. In the example below, the lines are set to the number of 10 (number of rows), with two additional columns: the first (#+1), shows the result of the @Formula defined in the Data Origin tab, and the second (#+2) displays the result of @Formula ((Mail_CurrentSize/1024)/1024):
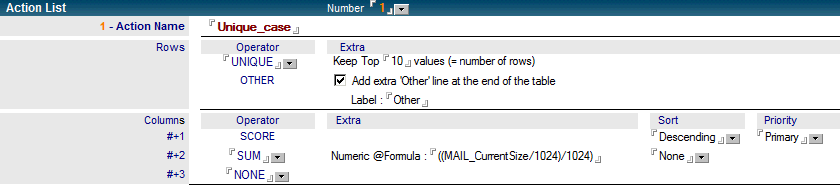
Note : By selecting NONE in the #+3 field of the Operator option, the 3rd column is inactive.
3. Creating a Word Report |
|
|
To create a Word report, please select Word from the Report File Format field, then attach a Word file in the Report Template file field. It is probably easier to start with a sample Word file provided with the product and modify it for your own needs. Word or Office 2003 (or later) must be installed on the computer where you build the reports.
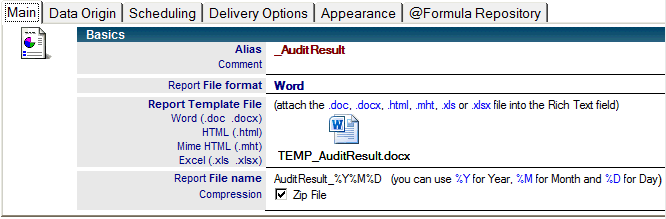
In the second tab called Data Origin of the Report Template, you must select the database the Desktop Manager User database in the Desktop Manager Source field. Then in the next section, using the Number field, you specify the number of documents to select and Document ID allows the selection of audit document on which you want to extract information displayed in the final report.

Example :
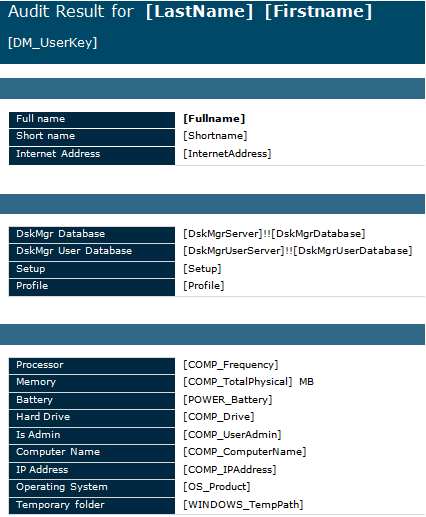
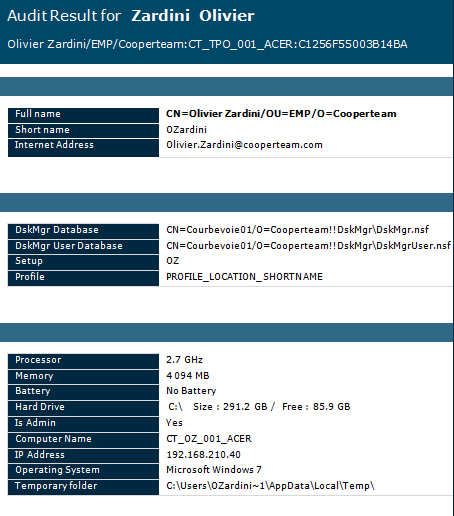
Below is a Word template sample, the report engine will automatically replace the field names ([Fullname], [ShortName], [InternetAddress], etc.) in order to insert the value of the fields of Audit Documents that you wish to appear in the rendering:
The Word Template:
The Word Report:
4. Creating an Excel Report |
|
|
To create a Excel report, please select Excel from the Report File Format field then attach an Excel file in the Report Template file field. It is probably easier to start with a sample Excel files provided with the product and modify for your own needs. Excel or Office 2003 (or later) must be installed on the computer where you generate reports.
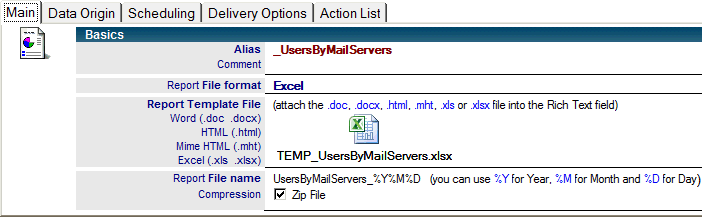
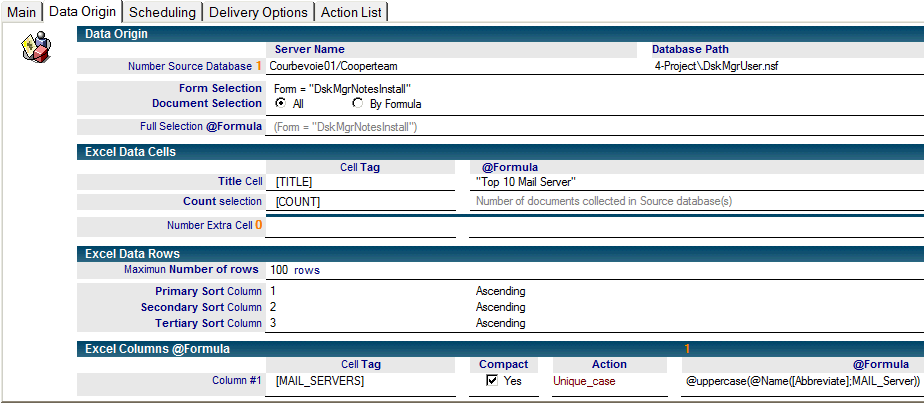
Excel Report is a good choice to create lists sorted, as a "Top 10 Mail Server" report. Please, use the Data Origin tab shown in the below picture, to specify what data are desired in the report.
For example, after selecting the Desktop Manager User database and target documents in the Data Origin section, use the Title Cell field from Excel Data Cells section, to specify a string (or keyword) present in the Excel file that the report engine will search for, then, it will be replaced by the result of the @Formula field (like "Top 10 Mail Server") in the generated Excel file.
In the next section, Excel Data Rows, the Maximum Number of rows field restricts results to a specified number (100 in the below image). The sample report shown below will extract the names of the mail servers ([MAIL_SERVERS]), as well as the number of users and the size of their mail databases using the Unique_case action (see Documentation Creating a Report Template document document for the explanation of the Action List tab):
Example :
Here is an Excel report sample with the final generated report. The cells from the template document show the keyword content as [TITLE], [MAIL_SERVERS], etc., allowing the report engine to replace these keywords by their values. In general, the report engine calculates the values of the @Formula fields first, and then process the Excel report to search the suitable space to insert data.
The Excel Template: The Excel Report:

5. Running a Report |
|
|
Open view Audit Results / Report / Report Setup, select the Report Template document and click the  button. You do not need to deploy specific binary for generating reports, the
  button will automatically load.
Viewing a report
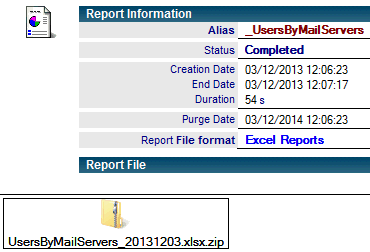
Once the report is generated, you will find a new document in the Audit Results / Report / Results view containing your report, as shown below:
Comments
0 comments
Article is closed for comments.